

Understanding Microsoft 365 Admin Roles: A Beginner’s Guide

Microsoft 365 is a powerful cloud-based suite that enables organizations to collaborate, communicate, and manage operations efficiently. To harness its capabilities securely, administrator roles define who can access and manage specific services like Exchange, SharePoint, Teams, and Entra ID.

This article, the first in a four-part series, introduces the fundamentals of Microsoft 365 administrator roles and outlines best practices for their assignment, focusing on the principle of least privilege (PoLP). Designed for beginners and IT professionals new to Microsoft 365, this guide provides a clear foundation with practical steps, examples, and checklists.
What Are Microsoft 365 Administrator Roles?
Microsoft 365 administrator roles are predefined permission sets that allow users to perform specific tasks within the platform. Managed through the Microsoft 365 Admin Center or Entra ID (Microsoft’s identity and access management service), these roles align with common administrative functions. Each role grants access to specific tools, settings, or data, ensuring administrators perform their duties without unnecessary exposure to other system areas.
Key Administrator Roles in Microsoft 365
Microsoft 365 offers roles ranging from broad to task-specific permissions. Below are some key roles and their responsibilities:
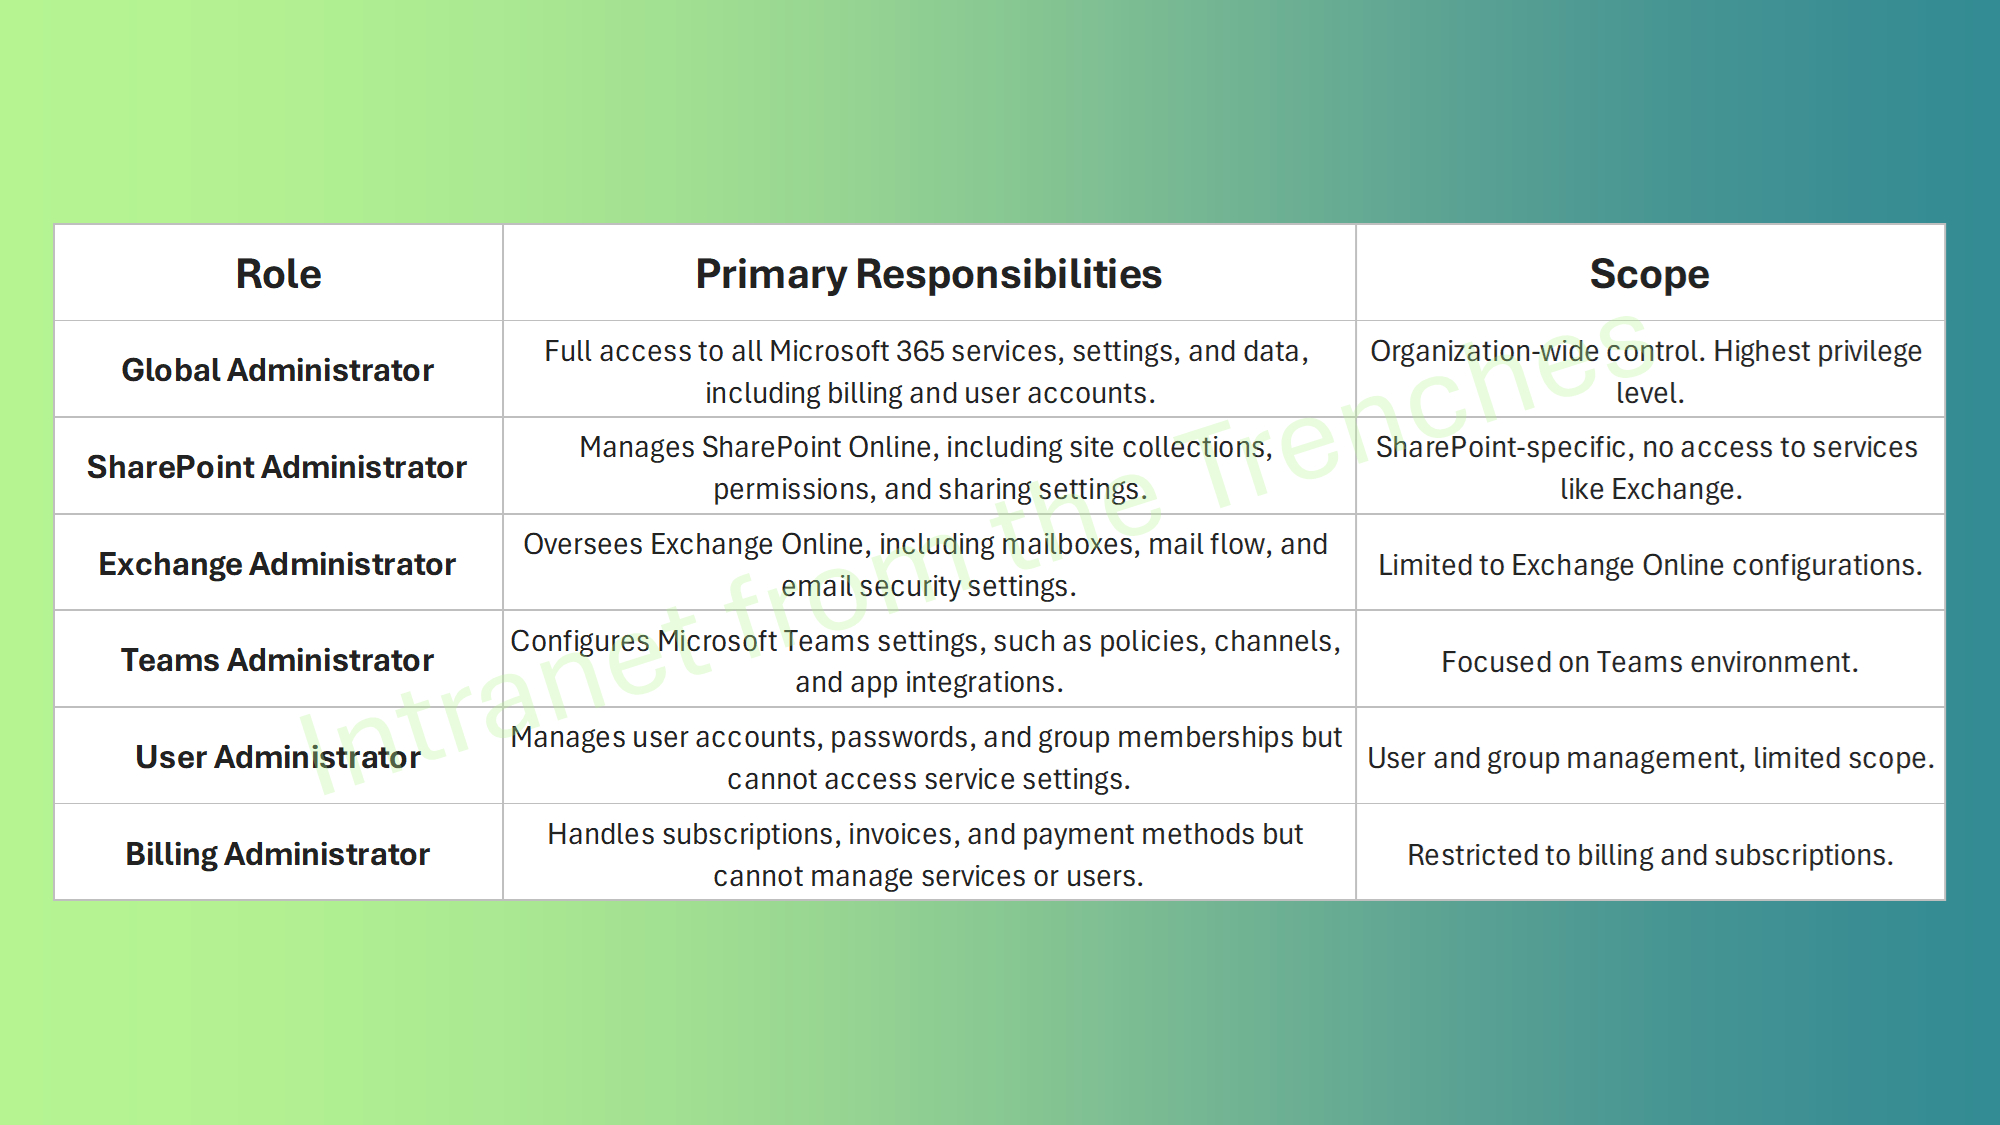
Other roles, like Security Administrator or Compliance Administrator, handle specialized tasks and will be explored in later articles. These roles follow the Role-Based Access Control (RBAC) model, ensuring permissions are task-specific. For example, a SharePoint Administrator cannot modify Exchange mailboxes, enhancing security.
Why Roles Matter
Assigning roles correctly is critical for both functionality and security. Improper assignments can lead to:
Security Risks: Overprivileged accounts may expose sensitive data or settings.
Operational Inefficiencies: Too many roles for one person can create bottlenecks.
Compliance Failures: Incorrect permissions may violate regulations like GDPR or HIPAA, which require strict data access controls.
Effective role management mitigates these risks and ensures smooth operations.
The Principle of Least Privilege
The principle of least privilege (PoLP) dictates that administrators should have only the permissions necessary for their tasks. This minimizes the attack surface and reduces risks of accidental or malicious changes.
Why PoLP Matters in Microsoft 365
Consider a scenario: Jane, an IT staff member, needs to manage Teams settings. Assigning her the Global Administrator role gives her access to billing, user data, and security settings—areas unrelated to her job. If Jane’s account is compromised, an attacker could cause significant issues across the tenant (your organization’s Microsoft 365 environment). Assigning her the Teams Administrator role instead limits her access, enhancing security.
Common Pitfalls in Role Assignment
New administrators often make mistakes that undermine PoLP. Below are three frequent issues, each described with a clear resolution and practical illustration to guide you:
Granting the Global Administrator role to multiple users for convenience can expose your organization to risks, as it provides unrestricted access to all services. To avoid this, limit this role to 2-3 trusted senior IT staff and assign specific roles for routine tasks. For instance, if John needs to reset user passwords, giving him the User Administrator role allows him to perform this task without accessing billing or security settings.
Assigning roles without fully understanding their scope can lead to unintended access. To prevent this, always review role descriptions in the Microsoft 365 Admin Center before assigning them. For example, a Billing Administrator only needs to manage subscriptions, so there’s no need to grant them SharePoint access, which could complicate their responsibilities.
Keeping roles assigned after tasks are complete can create security vulnerabilities. To address this, use temporary assignments or schedule regular reviews to ensure roles remain relevant. For instance, if a contractor needs the SharePoint Administrator role for a specific project, revoke it once the project is finished to prevent unauthorized access.
How to Assign Roles in Microsoft 365 Admin Center
With PoLP in mind, assigning roles is a simple process that ensures secure access. Follow these streamlined steps to assign roles effectively, designed to be easy for beginners to follow:
Step 1: Login and Navigate
Log in to the Microsoft 365 Admin Center at
https://admin.microsoft.com
using a Global Administrator account. From the left menu, click Users and select Active Users to view your team, or go to Roles and choose Role Assignments to see available roles.
Step 2: Choose the User and Role
Find the user who needs the role (e.g., Jane for Teams administration) by searching or scrolling through the user list. Click their name to open their profile, then select Manage Roles. Browse the list of roles, such as Teams Administrator, and check the description to ensure it matches their responsibilities.
Step 3: Apply and Confirm
Select the role, click Save Changes, and wait for the system to apply it. To confirm the role works, ask the user to perform a simple task, like Jane creating a Teams policy, or check the Role Assignments page to verify the update. Keep a record of the assignment for future reference, noting who received the role and why.
Checklist for Role Assignment
To ensure secure and consistent role assignments, use this detailed checklist with expanded explanations:
Understand the User’s Responsibilities: Before assigning a role, clarify what tasks the user needs to perform. For example, does Jane need to manage Teams channels or just user accounts? This step helps you identify the specific permissions required, ensuring you select a role that meets the user’s needs without granting unnecessary access.
Review Role Descriptions: Check the role’s permissions in the Microsoft 365 Admin Center or Entra ID to confirm it aligns with the user’s tasks. For instance, the User Administrator role allows password resets but not service configurations, so verify it’s suitable before assigning it to avoid mismatches.
Choose the Least Privileged Role: Select the role with the minimum permissions needed, adhering to PoLP. For example, if someone is managing email settings, assign the Exchange Administrator role instead of Global Administrator to reduce the risk of unauthorized access to other services.
Document the Assignment: Record details like the user’s name, the role assigned, the date, and the reason for the assignment in a spreadsheet or governance tool. For example, note that Sarah received the SharePoint Administrator role to manage site collections for a specific project, aiding in future audits and tracking.
Test the Role’s Functionality: After assigning the role, verify it works by having the user perform a task within their scope, such as creating a policy or updating a setting. This ensures the role is correctly configured and meets the user’s needs without requiring additional permissions.
Plan for Regular Reviews: Set a reminder to review the role assignment, typically every 6 months, to ensure it’s still necessary. For example, schedule a review for April 2026 to check if Jane still needs the Teams Administrator role or if her responsibilities have changed, keeping your environment secure.
Best Practices for Role Management
Beyond PoLP, adopt these practices to maintain a secure environment:
Limit Global Administrators: Restrict Global Admins to 2-5 senior IT staff for small to medium organizations, using specific roles for routine tasks. Larger enterprises may require additional Global Admins based on complexity.
Use Entra ID for Granular Control: Create custom roles for specific needs, like managing only certain SharePoint sites.
Enable Multi-Factor Authentication (MFA): Require MFA for all admin accounts in Entra ID under Authentication Methods.
Document and Track Roles: Use a spreadsheet or governance tool to track assignments.
Educate Admins: Train administrators on their role’s scope to prevent misuse.
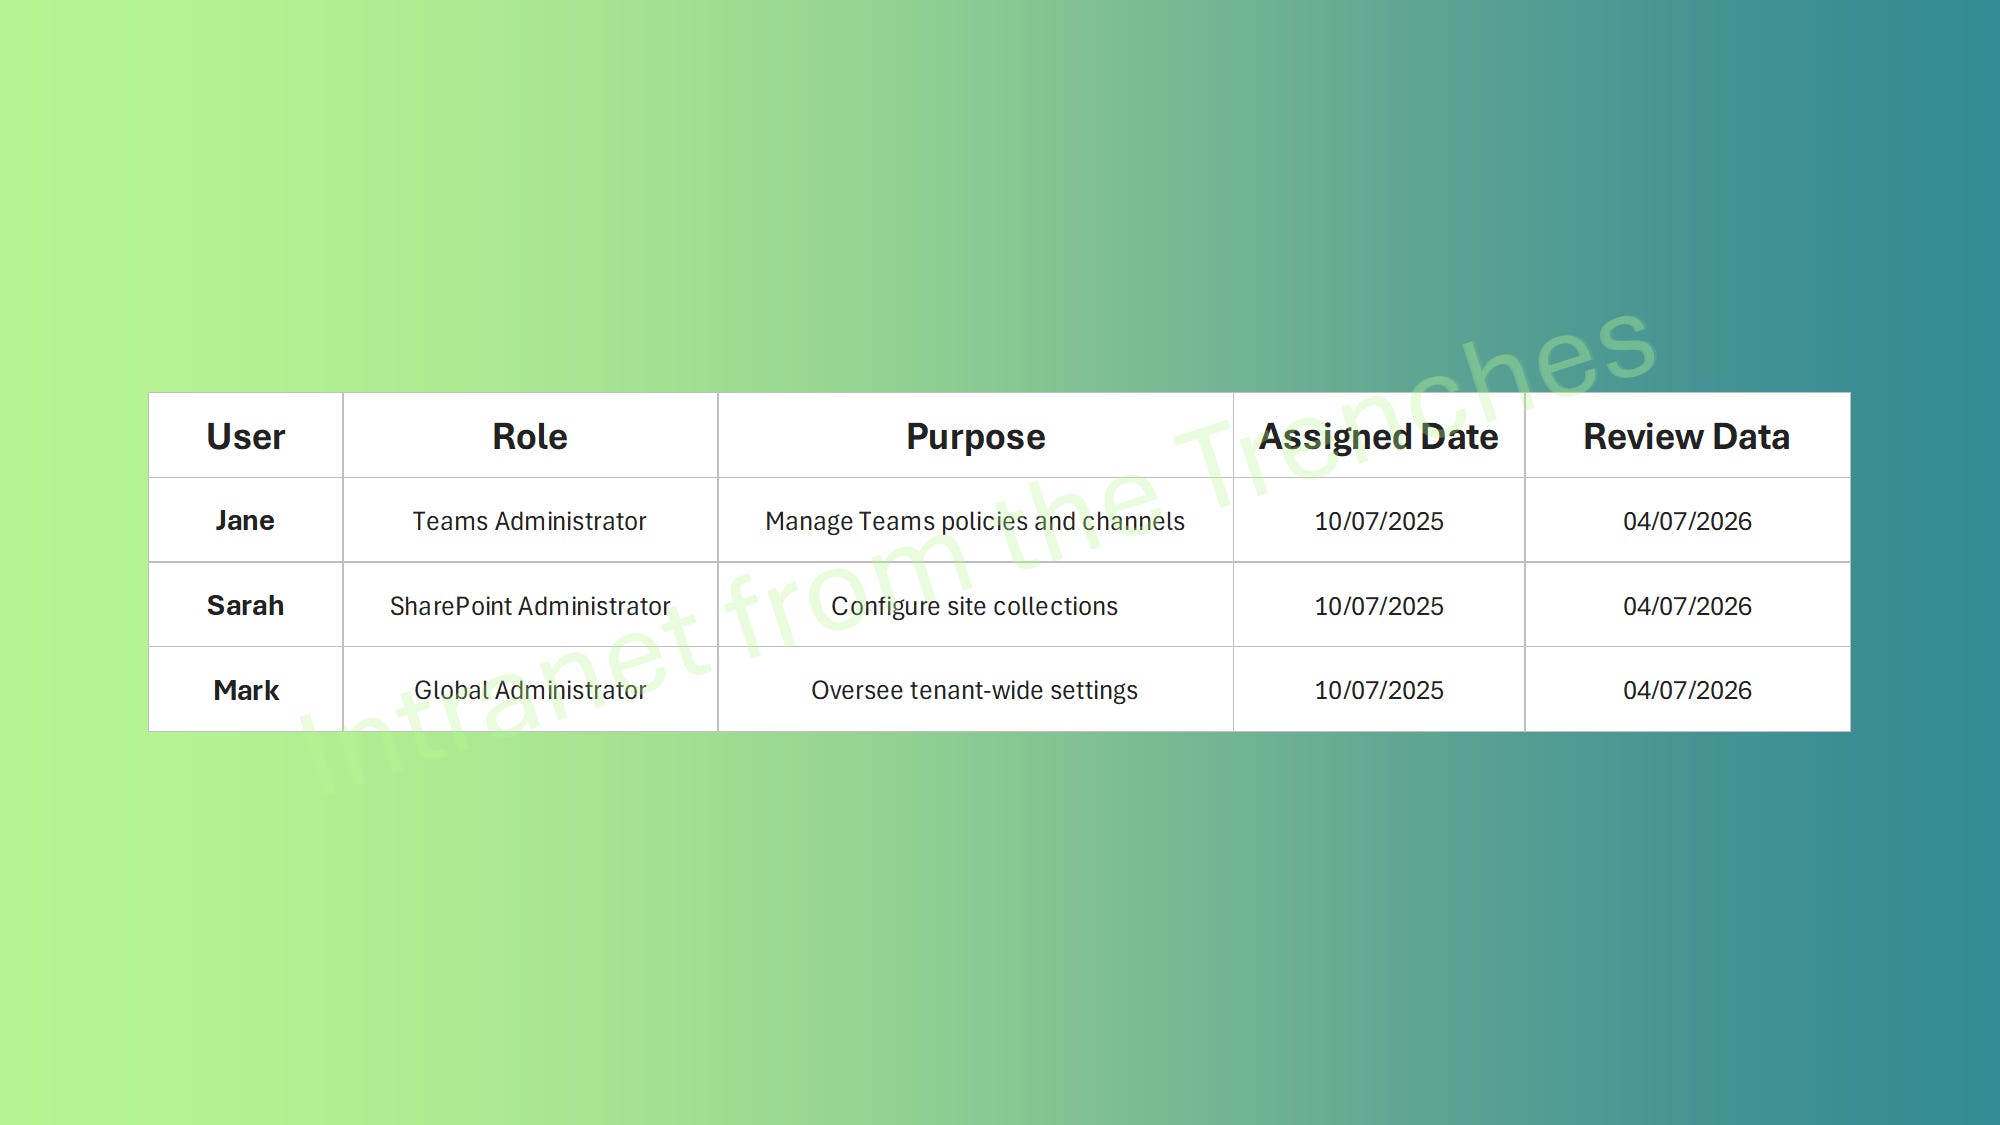
Sample Role Assignment Table
Real-World Example: Small Business Setup
In a 50-employee business adopting Microsoft 365, the IT team includes Alice (senior IT) and Bob (junior IT):
Global Admin: Alice handles tenant-wide configurations, like licensing and security policies.
Specific Roles: Bob, as User Administrator, resets passwords (e.g., unlocking an employee’s account) and, as Teams Administrator, manages collaboration tasks.
Outcome: Alice focuses on strategy, Bob handles operations, and MFA secures both accounts. Roles are documented for audits.
This setup ensures efficiency, security, and compliance. Have you reviewed your organization’s admin roles? Check your Microsoft 365 Admin Center and share your findings!
Conclusion
Understanding Microsoft 365 administrator roles and applying PoLP lays the foundation for a secure environment. In the next article, we’ll explore creating secure admin accounts and configuring “break glass” accounts for emergencies. Try assigning a role in your tenant and share your experience in the comments!
References
Part 2 - Create Secure Microsoft 365 Admin and Break Glass Accounts: https://intranetfromthetrenches.substack.com/p/create-secure-microsoft-365-admin-and-break-glass-accounts
Part 3 - Step-by-Step Microsoft 365 Admin Offboarding Process: https://intranetfromthetrenches.substack.com/p/step-by-step-microsoft-365-admin-offboarding-process
Part 4 - Beyond Basics with PIM, Custom Roles, Audits, and Monitoring for M365 Accounts Management: https://intranetfromthetrenches.substack.com/p/beyond-basics-with-pim-custom-roles-audits-and-monitoring-for-m365-accounts-management
How to Assign a M365 Role (61 sec):
About administrator roles in the Microsoft 365 admin center: https://learn.microsoft.com/en-us/microsoft-365/admin/add-users/about-admin-roles?view=o365-worldwide
Assign admin roles in the Microsoft 365 admin center: https://learn.microsoft.com/en-us/microsoft-365/admin/add-users/assign-admin-roles?view=o365-worldwide
The principle of least privilege with Microsoft Entra ID Governance: https://learn.microsoft.com/en-us/entra/id-governance/scenarios/least-privileged
A great article:). You may want to include use of Privileged Identity Management for Just in time/time limited access to the privileged roles mentioned in the article.