

Create Secure Microsoft 365 Admin and Break Glass Accounts

Imagine a phishing attack compromising your admin account, putting your entire Microsoft 365 environment at risk—or a misconfigured policy locking out your team during a critical operation. This second article in our four-part series builds on the foundation of administrator roles and the principle of least privilege (PoLP) to equip you with practical strategies for securing your Microsoft 365 environment.

You’ll gain clear, step-by-step methods to create dedicated administrator accounts that minimize security risks, configure emergency “break glass” accounts to ensure access during crises, and apply best practices to maintain compliance and protect sensitive data. These skills will empower you to prevent unauthorized access, streamline audits, and keep your organization’s services running smoothly, even in emergencies.
Why Dedicated Administrator Accounts Matter
In Microsoft 365, administrator accounts control critical services like Exchange, SharePoint, Teams, and Entra ID. Using dedicated accounts for administrative tasks, separate from everyday user accounts, enhances security and aligns with PoLP. Here’s why:
Security Isolation: Dedicated accounts reduce compromise risks. For example, if an admin uses their regular account for email and admin tasks, a phishing attack could expose tenant-wide settings.
Traceability: Actions by dedicated accounts are easier to audit in Microsoft Purview, as they’re tied to specific roles.
Granular Control: Dedicated accounts allow precise role assignments, ensuring admins only access their assigned services.
For instance, Sarah, a SharePoint Administrator, risks unauthorized changes if she uses sarah@company.com for admin tasks. A dedicated account, sarah.sharepoint@company.com, isolates her privileges, protecting the tenant.
Creating Dedicated Administrator Accounts
Establishing dedicated administrator accounts is essential for maintaining security boundaries in Microsoft 365, allowing admins to perform tasks without risking their primary user profiles. This approach minimizes exposure to threats while enabling efficient role-based management. Follow these steps, building on the role assignment process from our first article.
Step 1: Plan Account Structure
Define the account’s purpose based on roles and responsibilities:
Identify Roles: Determine which roles (e.g., Teams Administrator, Exchange Administrator) need dedicated accounts. Avoid Global Administrator for routine tasks.
Naming Convention: Use a consistent scheme, like [username].admin@company.com or admin.[role]@company.com (e.g., admin.sharepoint@company.com).
Licensing: Assign a license appropriate for the role, such as Microsoft 365 E5 for broad access or a specific service license for SharePoint.
As an example, for a small business, create:
alice.admin@company.com (Global Administrator)
bob.teams@company.com (Teams Administrator)
sarah.sharepoint@company.com (SharePoint Administrator)
Step 2: Create Accounts in Microsoft 365 Admin Center
Log in to the Microsoft 365 Admin Center with a Global Administrator account.
Navigate to Users > Active Users > Add a User.
Enter details for the admin account:
First Name/Last Name: E.g., “SharePoint” and “Admin” for clarity.
Username: E.g., sarah.sharepoint@company.com.
License: Assign a license (e.g., Microsoft 365 E5).
Set a strong initial password and require the user to change it on first login.
Save the account.
Step 3: Assign Roles
In the Admin Center, go to the new user’s profile and click Manage Roles.
Assign the appropriate role (e.g., SharePoint Administrator for Sarah).
Verify the role assignment in Roles > Role Assignments and test access (e.g., Sarah logs in and creates a SharePoint site).
Tip: You can do this step when creating the account in the proper step.
Step 4: Secure with Multi-Factor Authentication (MFA)
Multi-Factor Authentication (MFA) enhances account security by requiring users to verify their identity through multiple methods—such as a password combined with a phone app notification or code—beyond just a single credential, significantly reducing the risk of unauthorized access from compromised passwords. Enabling MFA is critical for admin accounts to safeguard sensitive operations. Here’s how to configure it:
In the Entra ID Admin Center, navigate to the Conditional Access option.
Create a policy (e.g., “MFA for Admin Accounts”):
Assignments: Target the new admin accounts (e.g., sarah.sharepoint@company.com).
Grant: Require MFA, prioritizing the Microsoft Authenticator app.
Notify the admin to register their MFA method via myaccount.microsoft.com (e.g., scan a QR code for Authenticator).
Test MFA by having the admin log in and approve the prompt.
Tip: Microsoft creates two default policies to force MFA, one for admin accounts, and the second for all users of the tenant. You can disable them and create yours, or modify the existing ones.
Configuring Emergency “Break Glass” Accounts
With dedicated accounts handling routine tasks, emergency “break glass” accounts serve as a secure fallback for crises like lockouts from misconfigured Conditional Access policies, account compromises requiring immediate recovery, or MFA failures due to lost devices. These highly privileged accounts demand strict controls to mitigate risks and prevent misuse.
Step 1: Create the Break Glass Account
In the Microsoft 365 Admin Center, add a user (e.g., breakglass@company.com).
Assign the Global Administrator role for full emergency access.
Assign a license, usually a Microsoft 365 E5, to be able to act accordingly.
Set a strong, unique password (20+ characters, stored in a secure vault like LastPass or a physical safe).
Step 2: Secure the Account
Limit MFA Exposure: Break-glass accounts may be exempted from MFA for emergencies. In Entra ID, modify the current Conditional Access policies and exclude the breakglass@company.com, but add controls like IP restrictions (e.g., allow access only from a corporate office IP).
Restrict Usage: Disable non-admin functions via PowerShell:
Set-Mailbox -Identity breakglass@company.com -HiddenFromAddressListsEnabled $true
Monitor Activity: Set up alerts in Microsoft Purview:
Go to Purview > Alerts > Alert Policies.
Create a policy for “User logged in to break glass account.”
Step 3: Document and Test
Document credentials, storage location, and authorized users.
Test the account quarterly (e.g., simulate a lockout and regain access).
Log tests in Purview for audits.
Best Practices for Managing Admin Accounts
To ensure secure management of dedicated and break-glass accounts, follow these practices, including a consolidated checklist:
Separate Admin and User Accounts: Use dedicated accounts for admin tasks, not daily activities like email or Teams chats.
Standardize Naming: Adopt role-based naming (e.g., admin.teams@company.com) for traceability.
Enforce MFA (Except the Break Glass account): Require MFA for all admin accounts, prioritizing Authenticator. For break-glass accounts, use IP restrictions or other controls.
Inventory Accounts: Track account names, roles, MFA status, and review dates in a spreadsheet or governance tool.
Train Admins: Educate admins on using dedicated accounts and reporting issues (e.g., lost MFA devices).
Limit Break-glass Accounts: Maintain 1-2 break-glass accounts, stored securely and monitored via Purview.
Regular Reviews: Audit all accounts every 6 months to confirm relevance and security.
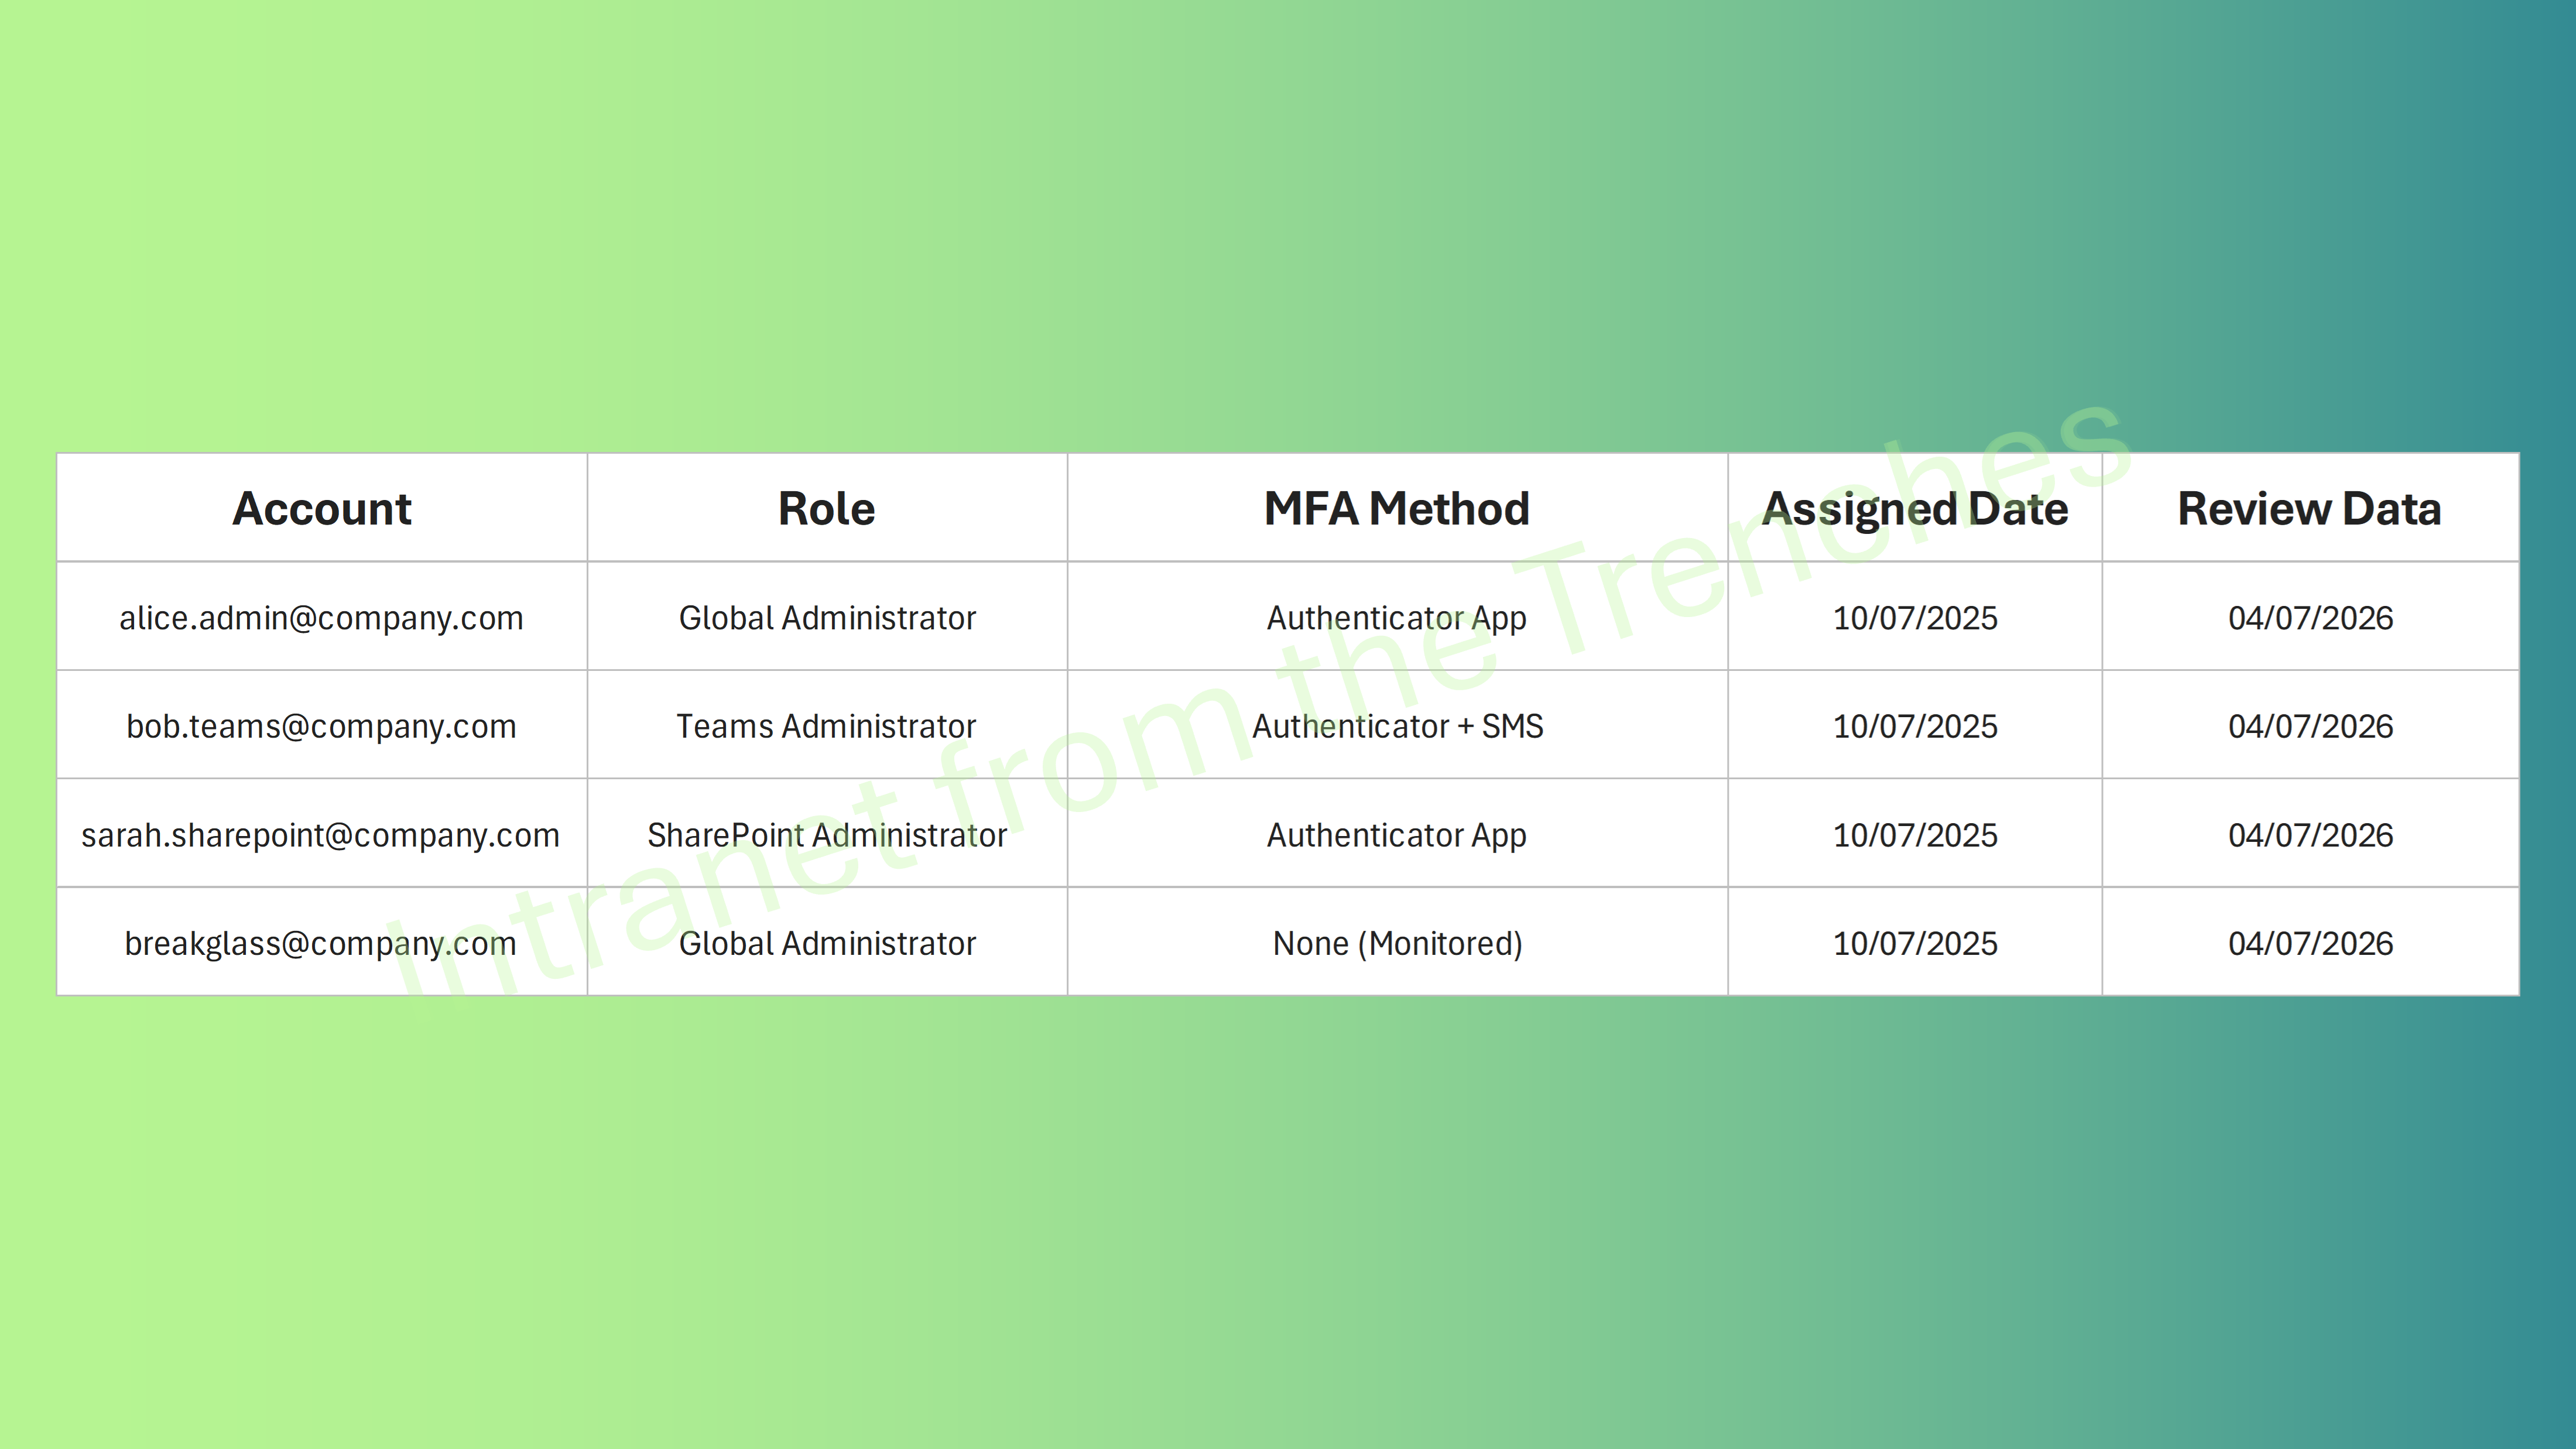
Admin Account Tracker
Tracking Microsoft 365 admin accounts ensures robust security and compliance by maintaining a clear record of roles, MFA status, and review schedules. The example below simplifies account management, enables efficient audits, and helps prevent unauthorized access, keeping your environment secure and well-organized.
Real-World Example: Account Setup for a Medium-Sized Organization
In a 200-employee company transitioning to Microsoft 365, the three-person IT team—Alice (senior IT lead), Bob (collaboration specialist), and Sarah (content manager)—implements secure accounts to address past issues like overprivileged access and phishing vulnerabilities. Here’s how they structure it for efficiency and compliance:
Alice: Establishes alice.admin@company.com as a Global Administrator for overseeing tenant-wide configurations, such as licensing and high-level security policies. Secured with MFA via the Microsoft Authenticator app, this account allows her to handle strategic tasks without exposing her daily email account, reducing the risk of widespread compromise in case of a breach.
Bob: Sets up bob.teams@company.com with the Teams Administrator role, adding SharePoint Administrator permissions for cross-service tasks like integrating Teams channels with SharePoint sites. MFA is configured with Authenticator as primary and SMS as backup, enabling him to manage collaboration tools securely while addressing the team’s need for hybrid work environments.
Sarah: Configures sarah.sharepoint@company.com as a SharePoint Administrator to focus on site collections, permissions, and content sharing. MFA via Authenticator ensures her account remains protected, allowing her to enforce data governance without unnecessary access to other services.
Break Glass: Deploys breakglass@company.com as a Global Administrator, exempted from MFA but restricted to a specific corporate IP range for emergency use only. Credentials are stored in a tamper-proof vault accessible to senior leadership, with all activity monitored and alerted via Microsoft Purview to detect any unauthorized attempts.
This setup not only aligns with PoLP by limiting privileges but also proved effective during a simulated MFA outage drill: The team used the break-glass account to quickly restore access, rotated its password post-test, and documented the incident for compliance audits. Overall, it minimized downtime risks, improved traceability, and supported the company’s GDPR compliance efforts by isolating sensitive admin actions.
Conclusion
This article guides you through creating dedicated Microsoft 365 administrator accounts, securing them with MFA, and setting up emergency break-glass accounts to handle crises. By implementing these strategies, you’ll protect critical services from unauthorized access and maintain operational continuity during emergencies.
In the next article, we’ll dive into managing smooth administrator transitions—such as when admins change roles or leave the company—and avoiding common errors in daily role management to keep your environment secure. Set up a dedicated admin account in your tenant today and share your experience in the comments!
References
Part 1 - Understanding Microsoft 365 Admin Roles: A Beginner’s Guide: https://intranetfromthetrenches.substack.com/p/understanding-microsoft-365-admin-roles-a-beginners-guide
Part 3 - Step-by-Step Microsoft 365 Admin Offboarding Process: https://intranetfromthetrenches.substack.com/p/step-by-step-microsoft-365-admin-offboarding-process
Part 4 - Beyond Basics with PIM, Custom Roles, Audits, and Monitoring for M365 Accounts Management: https://intranetfromthetrenches.substack.com/p/beyond-basics-with-pim-custom-roles-audits-and-monitoring-for-m365-accounts-management
About administrator roles in the Microsoft 365 admin center: https://learn.microsoft.com/en-us/microsoft-365/admin/add-users/about-admin-roles?view=o365-worldwide
Manage emergency access accounts in Microsoft Entra ID: https://learn.microsoft.com/en-us/entra/identity/role-based-access-control/security-emergency-access
How it works: Microsoft Entra multifactor authentication: https://learn.microsoft.com/en-us/entra/identity/authentication/concept-mfa-howitworks
What is Conditional Access?: https://learn.microsoft.com/en-us/entra/identity/conditional-access/overview
I implemented a break glass last year. Purview alerts in case account is used sounds interesting. I currently use log analytics which receive signin logs and I set up an alert there. I also used passkeys as Mfa for the account. I always stress that this account should be excluded from conditional access policies.