


How to Lock Down SharePoint Sites for Legal Case Management

You’ve been entrusted with a critical task: securing the legal team’s SharePoint site, a repository for sensitive case files like client contracts and court filings. This isn’t just about technology—it’s about earning the legal team’s trust by ensuring their documents are protected from unauthorized access. With Microsoft 365’s restricted access control, you can turn their SharePoint site into a digital fortress.

In this guide, I’ll walk you through restricting access using Microsoft 365 groups or Microsoft Entra security groups, covering both the user interface (UI) and PowerShell. I’ll also share a pro tip for dynamic groups and provide a comprehensive table to clarify access scenarios.
Ready to become the legal team’s tech hero? Let’s get started!
The Legal Team’s Need: A Secure SharePoint Site
The legal team needs their SharePoint site to be a fortress for their case management files—think attorney-client privileged notes, deposition transcripts, and sensitive agreements. They want access restricted to a select group, like the core legal team and a few external consultants, with no chance of anyone else sneaking in. SharePoint’s restricted access control lets you limit access to specific Microsoft 365 groups or Microsoft Entra security groups, ensuring the site is locked down tight. It’s a site-wide rule, so every file, folder, and list is protected.
Here’s the deal: you’ll need Microsoft SharePoint Premium - SharePoint Advanced Management to use this feature. Also, the site owner and admins must be in the allowed groups, or they’ll be locked out faster than a lawyer objecting in court. I once flubbed this on a test site and spent an hour scrambling to fix it—trust me, check those group memberships before you save!
The legal team requires a SharePoint site that acts as a secure vault for case management files—think attorney-client privileged notes, deposition transcripts, and confidential agreements. Access must be limited to a select group, such as the core legal team and specific external consultants, with no risk of unauthorized entry.
Microsoft 365’s restricted access control allows you to restrict site access to designated Microsoft 365 groups or Microsoft Entra security groups, applying site-wide protection to every file, folder, and list.
SharePoint Advanced Management license is required to enable restricted access control. And, the site owner and admins must be included in the allowed groups to avoid being locked out. I once overlooked this on a test site and spent an hour scrambling to regain access—don’t make the same mistake!
Step 1: Enable Site-Level Access Restriction at the Tenant Level
Before locking down the site, you must enable site-level access restriction at the tenant level. Think of this as installing a security system before securing the doors.
Via SharePoint Admin Center
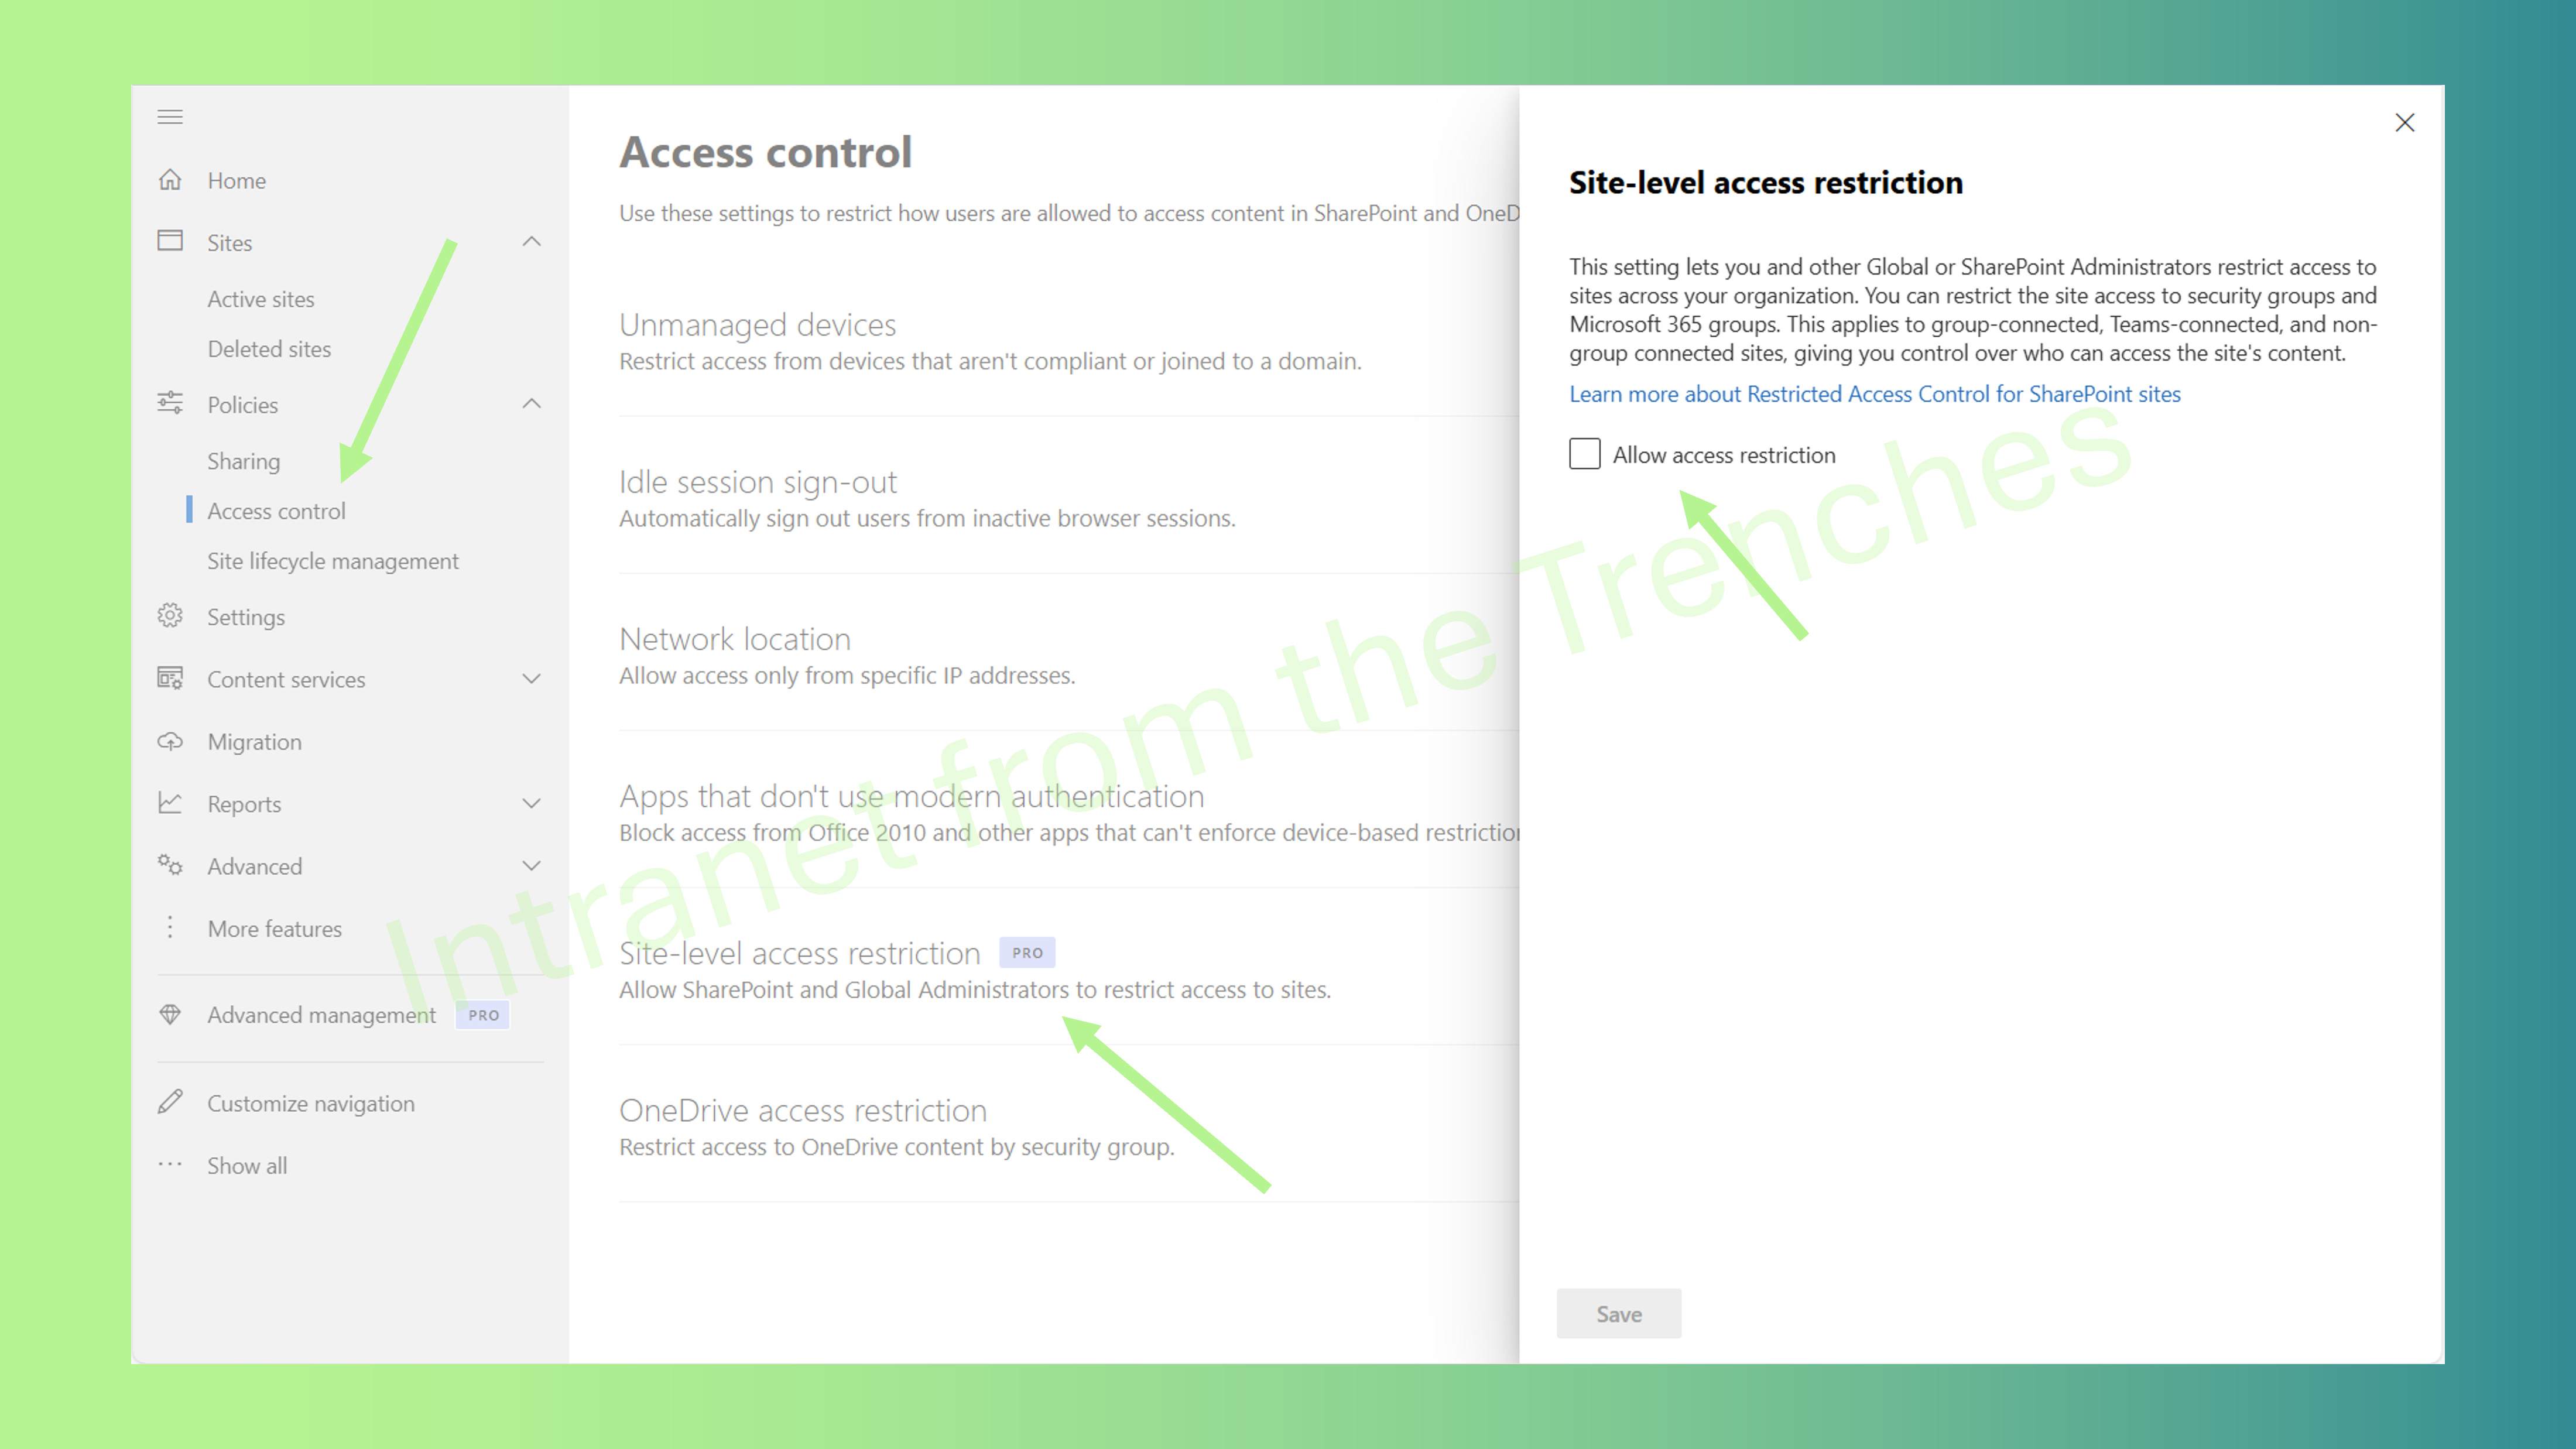
Navigate to the SharePoint Admin Center > Policies > Access control > Site access restriction.
Check Allow access restriction and click Save.
Allow up to an hour for the setting to propagate across the tenant.
Via PowerShell
For those who prefer the command line, use the SharePoint Online Management Shell:
Set-SPOTenant -EnableRestrictedAccessControl $trueIn a Microsoft 365 Multi-Geo environment, run this command for each geo-location. While waiting for propagation, you might rehearse your victory speech for the legal team.
This step is non-negotiable—without it, site-level restrictions won’t work.
Step 2: Configure Site Access in the SharePoint Admin Center
With the tenant prepared, configure the legal team’s SharePoint site for restricted access. The SharePoint Admin Center offers a user-friendly, point-and-click approach, ideal for managing a single site.
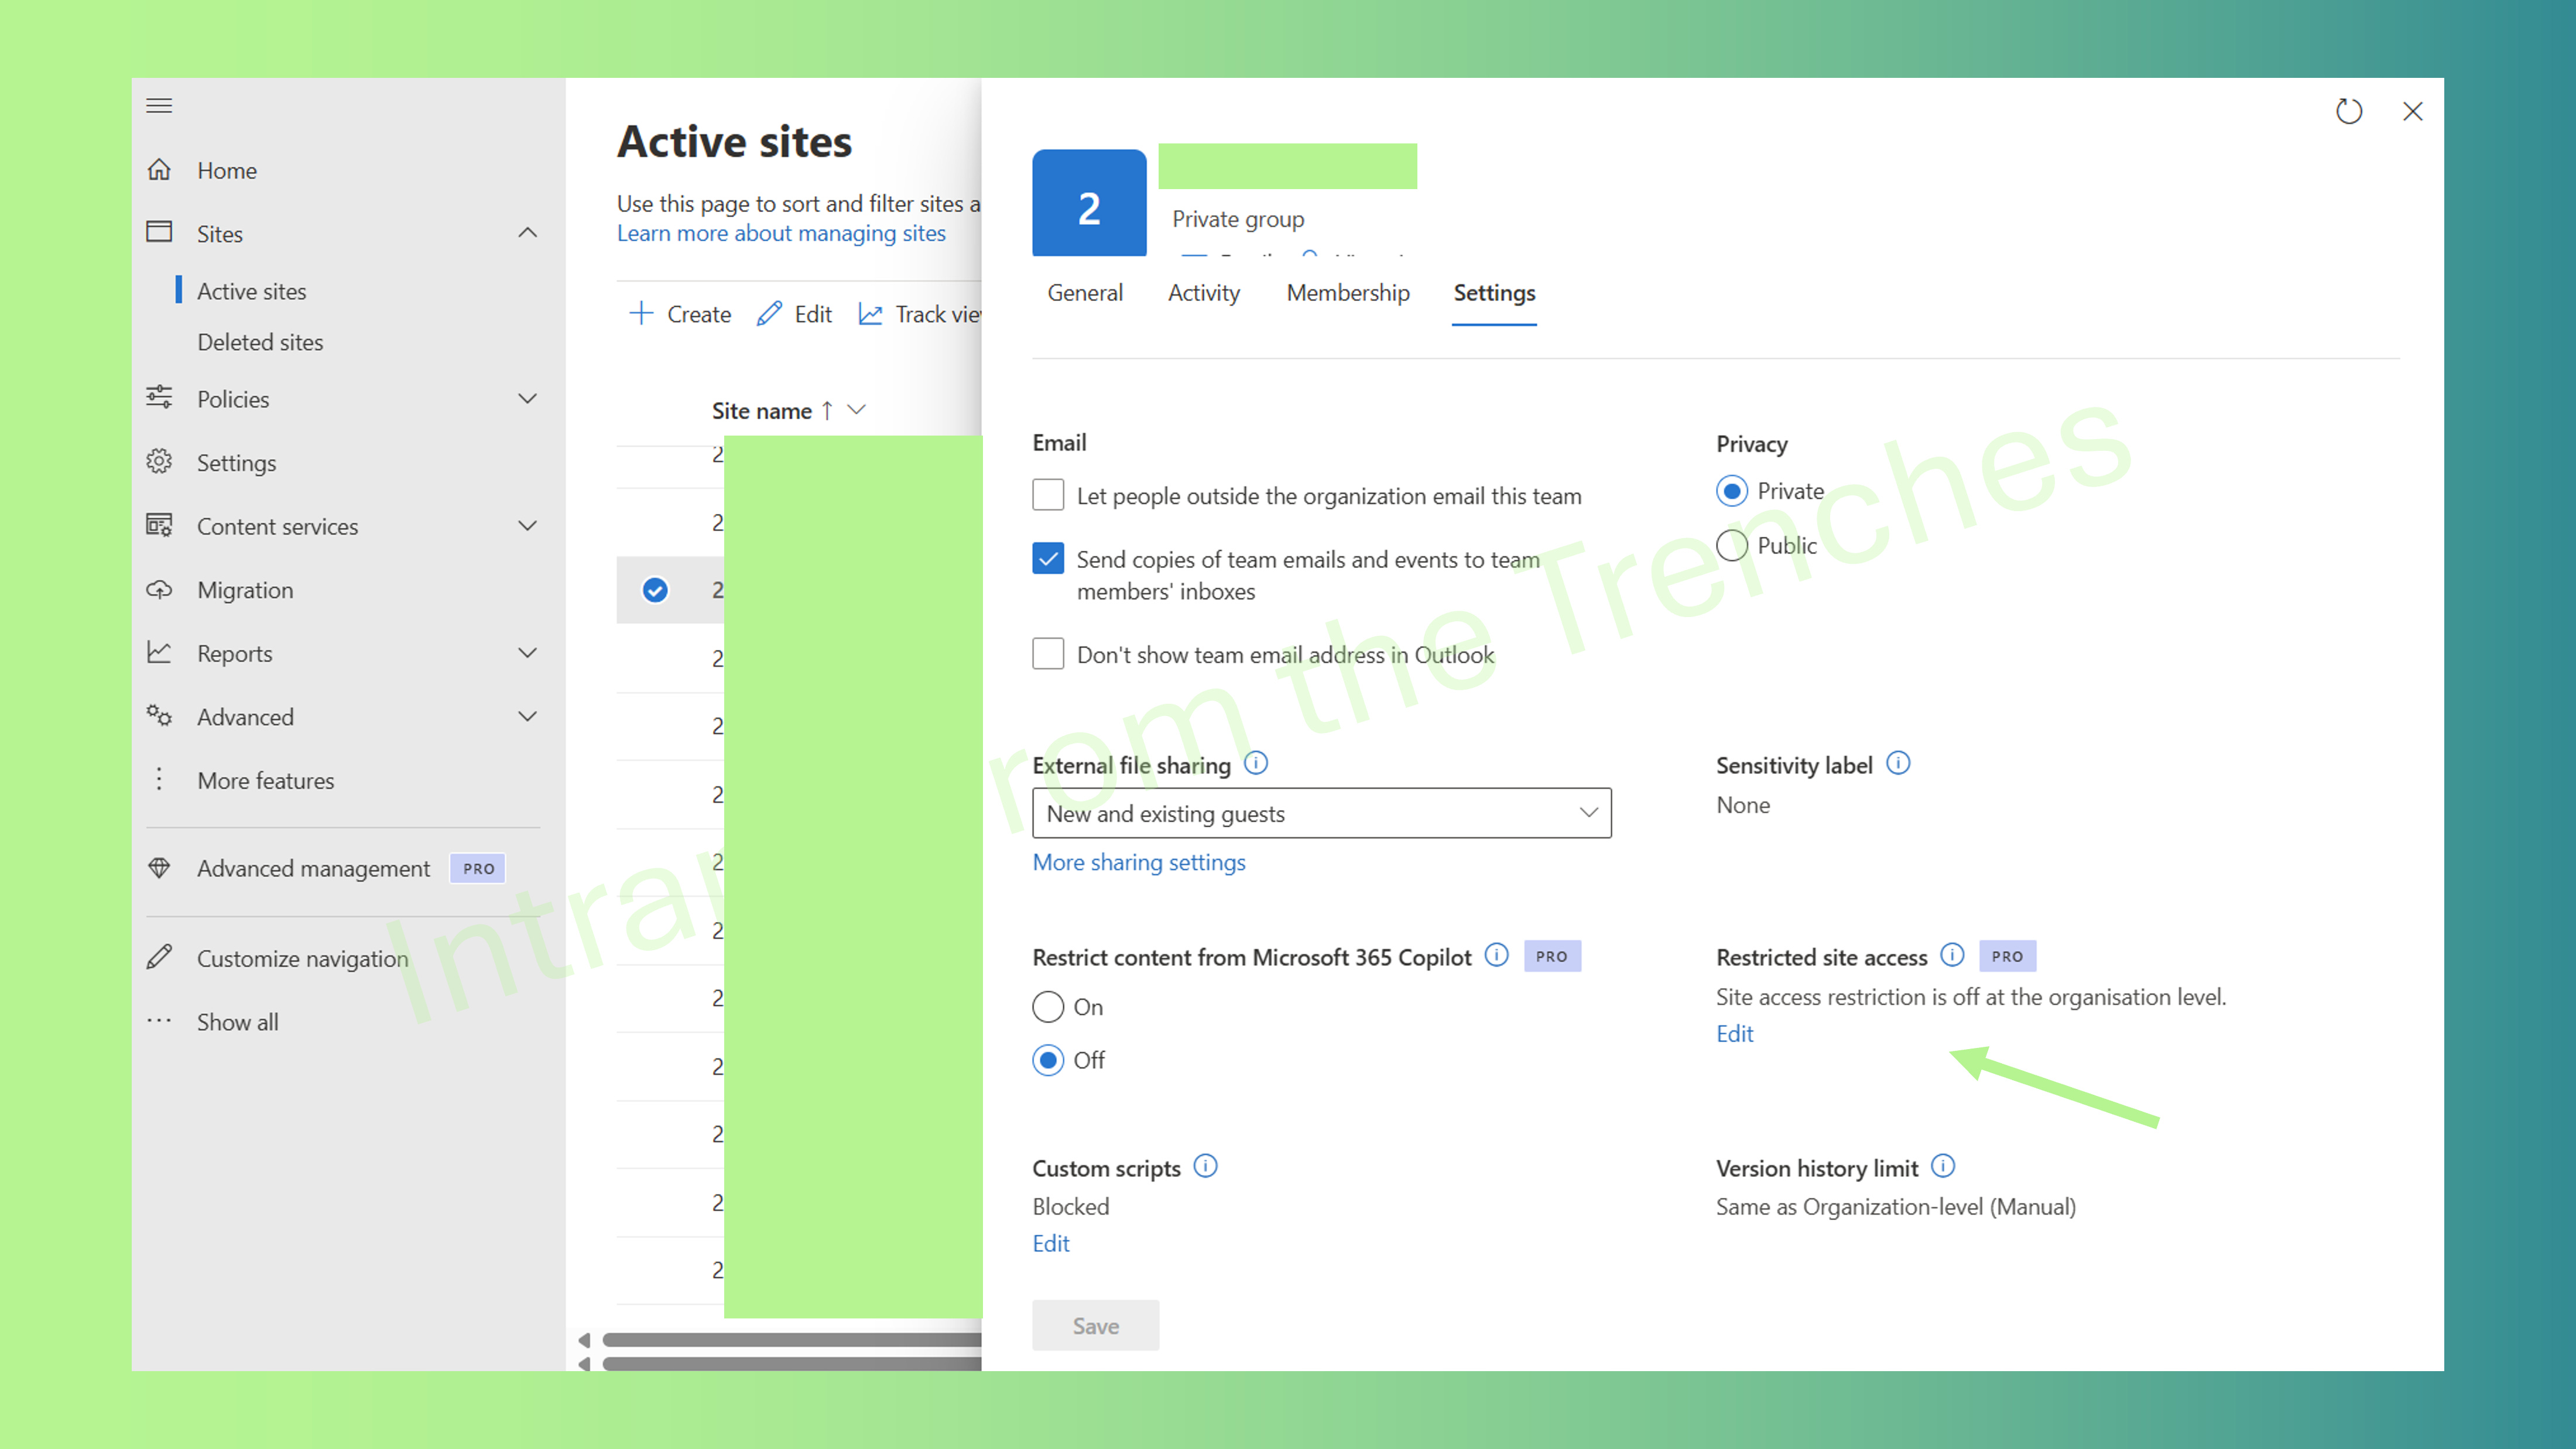
In the SharePoint Admin Center, go to Active sites.
Locate the legal team’s site (e.g., https://your-tenant.sharepoint.com/sites/LegalCase2025). Use the search bar if needed.
Select the site, navigate to the Settings tab, and under Access control, add up to 10 Microsoft 365 groups or Microsoft Entra security groups (e.g., “LegalCoreTeam” and “ExternalConsultants”).
Verify that the site owner (e.g., the lead attorney) and admins are members of at least one allowed group to prevent lockout.
This method is straightforward but can be time-consuming for multiple sites. For efficiency, PowerShell is the better option.
Step 3: Restrict Access Using PowerShell
PowerShell is your ally for speed and scalability, especially when managing multiple sites. The Set-SPOSite cmdlet streamlines the process of restricting access.
Connect to SharePoint Online:
Connect-SPOService -Url https://<your-tenant>-admin.sharepoint.comEnable restricted access for the site:
Set-SPOSite -Identity https://<your-tenant>.sharepoint.com/sites/LegalCase2025 -RestrictedAccessControl $trueAssign specific groups to control access:
Set-SPOSite -Identity https://<your-tenant>.sharepoint.com/sites/LegalCase2025 -AddRestrictedAccessControlGroups @("LegalCoreTeamID", "ExternalConsultantsID")For multiple sites, you can automate with a loop (contact me for a sample script!). Always test on a non-production site to avoid surprises.
Pro Tip: Leverage Dynamic Groups for Automation
Simplify ongoing maintenance with a dynamic Microsoft Entra security group. Dynamic groups automatically update membership based on user attributes, such as Department, eliminating manual updates.
In the Microsoft Entra admin center, create a dynamic security group with a rule like:
user.department -eq "Legal"This automatically includes users with “Legal” in their Department attribute.
Assign the dynamic group to the SharePoint site in Step 2 or 3.
Ensure the site owner’s Department attribute is set to “Legal” to avoid lockout.
Dynamic groups are ideal for teams with frequent staff changes, ensuring new legal team members gain access automatically.
Controlling Sharing with Non-Group Members
By default, users with edit or admin permissions can attempt to share site content with users outside the allowed groups. However, those recipients cannot access the content unless they’re in an allowed group. To prevent confusion:
Sharing Behavior: Users can generate sharing links for external or non-group users, but access is blocked with an “access denied” message.
Recipient Experience: Non-group members may receive a sharing link and see the item in their email or SharePoint interface (e.g., via search), but attempting to open it results in an error.
Prevent Unauthorized Sharing: Block sharing with non-group members at the tenant level:
Set-SPOTenant -AllowSharingOutsideRestrictedAccessControlGroups $falseRun this command after Step 1 to ensure only allowed group members can be shared with, preventing accidental sharing of sensitive files like deposition transcripts.
This setting is critical for the legal team’s high-security needs and should be communicated to manage expectations.
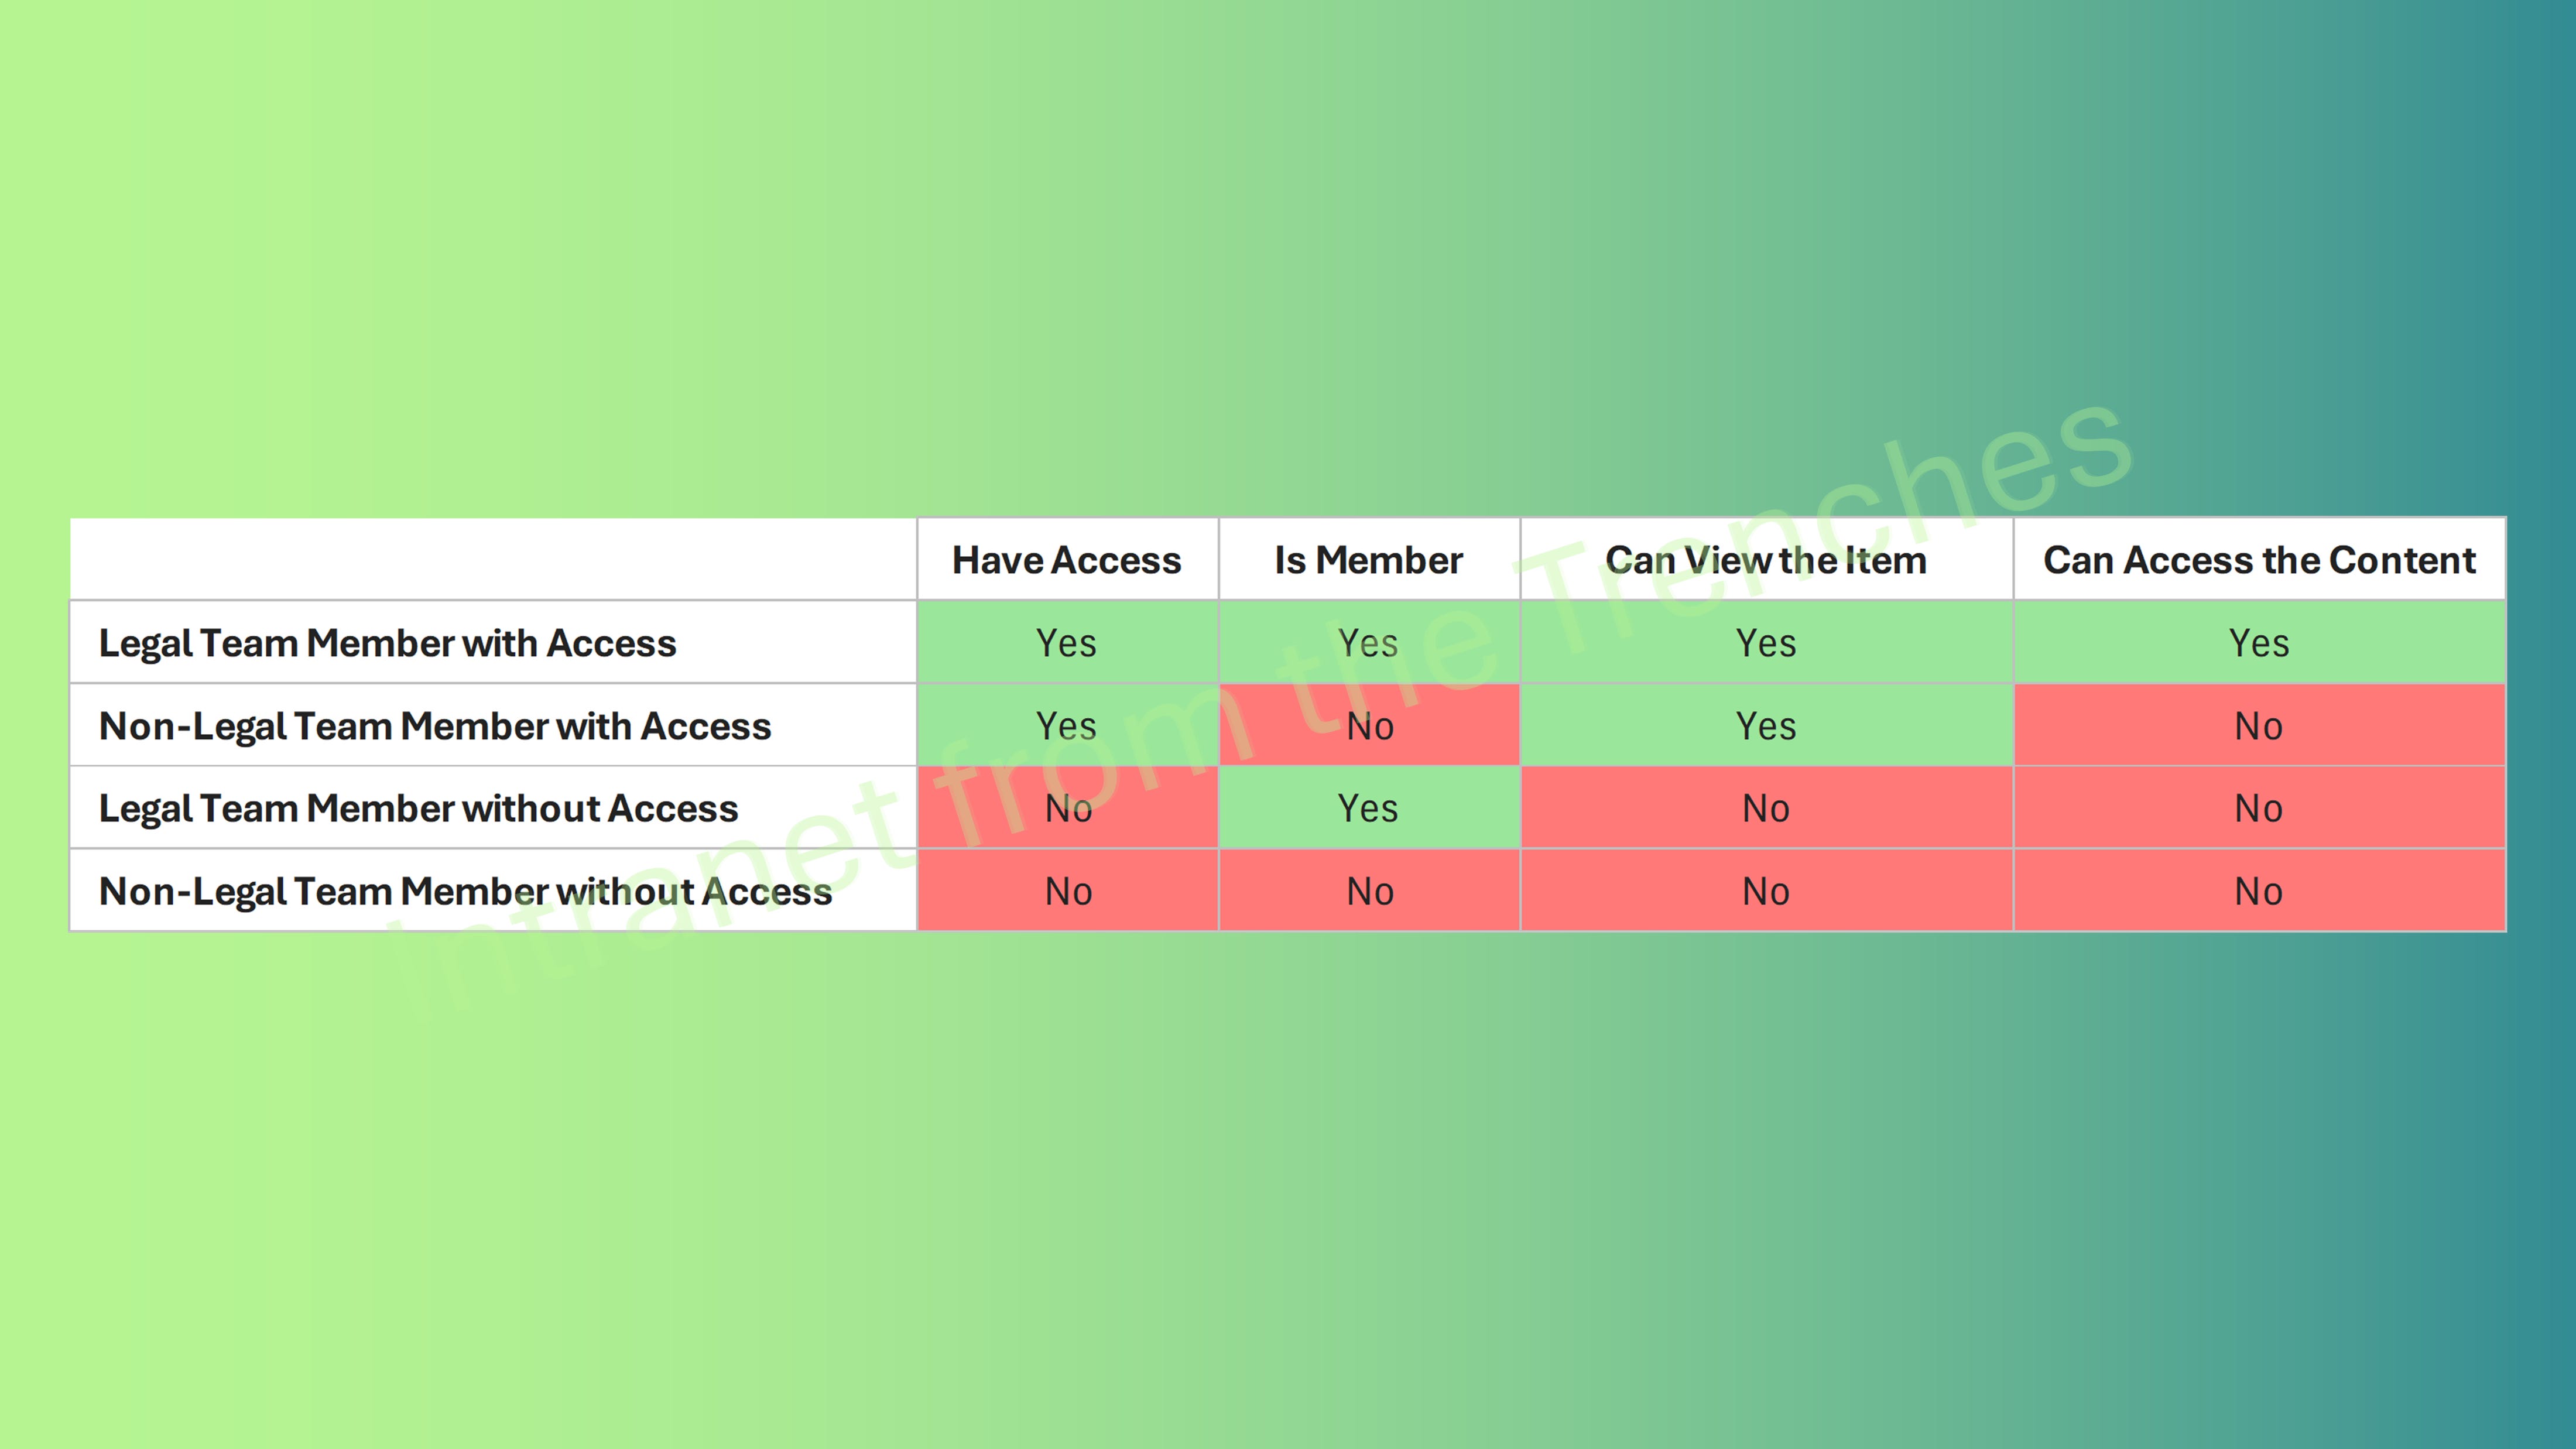
Understanding Access Scenarios
To clarify how restricted access control behaves, here’s a table detailing all access scenarios:
Conclusion
Securing the legal team’s SharePoint site is a powerful demonstration of Microsoft 365’s restricted access control. By enabling tenant-level restrictions, configuring group-based access, using dynamic groups for automation, and enforcing sharing restrictions, you’ve created a robust, secure environment for sensitive case files. The access scenarios table clarifies who gets access and why, equipping you to apply this feature confidently in any high-stakes scenario.
Did this guide help you tame your OneDrive storage? Share it with colleagues and friends to help them optimize their Microsoft 365 setup too!
References
Restrict SharePoint site access with Microsoft 365 groups and Microsoft Entra security groups - SharePoint in Microsoft 365: https://learn.microsoft.com/en-us/sharepoint/restricted-access-control
Set-SPOTenant: https://learn.microsoft.com/en-us/powershell/module/microsoft.online.sharepoint.powershell/set-spotenant?view=sharepoint-ps